Part I of a III-Part Series Click here to download a printable version.
Removing an axle sounds easy enough until an hour later you’re covered in sweat with murder in your eyes. You don’t have to slam your kart into a wall and bend the axle like a pretzel to make it difficult to remove. In fact, many a karter’s Thor-like technique for installation and removal is plenty to do in an axle. You know I’m talking about you. I’m talking about me too, that is before I was shown how to do it the right way by some very talented (and patient) mechanics. Now I’m gonna show you.
A perfectly installed axle that spins for days is a point of pride for anyone who cares about kartcraft. But like most difficult tasks, doing it right takes doing a bunch of other stuff right first. That’s why this three-part series starts with axle removal, because how you remove an axle has everything to do with how it’ll go back in. Part II covers the dos and a few don’ts of bearing maintenance. Part III finally explains how to install an axle that’s spinning will make you the envy of the paddock. There’s lots to do first, so let’s get greasy.
To make sure you remember how everything goes back together, snap a few pictures of your rear end. (Not “your” rear end like Kim Kardashian, your kart’s.)
Remove the wheels/hubs and their keys.
If there’s no logo on the axle, grab your Sharpie and put an “E” inside the engine side of the axle so you reinstall it with all the keyways in the right spots.
Loosen the engine to slack and remove the chain.
If the sprocket hub is between the bearings, loosen its pinch bolts and slide it toward middle of the axle to remove its key. If the hub is too tight to slide, loosen the bolts attaching the sprocket or tap a blade screwdriver into the hub’s pinch slot along the axle to spread it open.
Loosen the brake rotor hub. Give it a couple taps with a mallet to free it from the axle. If it moves fairly easily, lucky you. If not, try the screwdriver trick from the previous step.
Detach the seat struts, radiator supports and other accessories from the bearing cassettes. Loosen the bolts attaching the third bearing cassette to the chassis. However, don’t loosen the two outside cassettes or their pinch bolts if you’re quick swapping axles.
Remove the setscrews connecting the bearings to the axle.
Wipe the axle clean of all grit. Hose it down with WD-40 for some light lubrication, being careful not to spray the brakes… A little overspray is fine, just hit it with brake cleaner.
Now stop. What’s next depends on the condition of your axle…
After removal, inspect carefully for cracks that were hiding in the bearings. You don’t ever want to have an axle break on track. Ever.
TOTALLY FINE, JUST MAKING A SWAP FOR TUNING PURPOSES: Carry on, just take care not to crowbar the bearings out of alignment with the axle as you remove it… especially after it’s free of the first bearing.
ONLY SLIGHTLY TWEAKED: You should be able to get it through the bearings without excessive pounding. However, if you have time, see if you can pinpoint the high spot of the bend and give it a sharp whack or two with a rubber mallet to straighten it. Nonetheless, you may still need to push the axle fully through the bearings with an axle removal tool… make your own from a straight 12″ section of a junk axle.
A BIT BENT. BUT FIXABLE: Unless you or your shop has highly specialized equipment, the best place to straighten an axle is in a kart. So if you hope to use this axle again, you have no choice but to fix it right now. If you don’t have time, sorry…
IT’S TRASH: Bummer, but find a Sawzall to cut your junk axle and the time you’ll waste trying to get it out in one piece if it’s bent anywhere but outside the engine bearing. You’re cutting to create a straight end on the axle that you can get though the bearings. Don’t forget to file off the burrs.
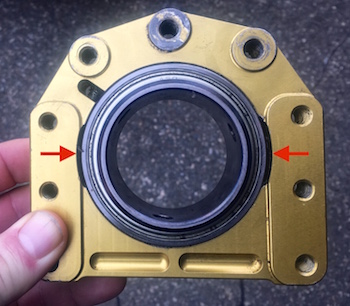
Those two slots on the cassettes are for getting the bearings in and out.
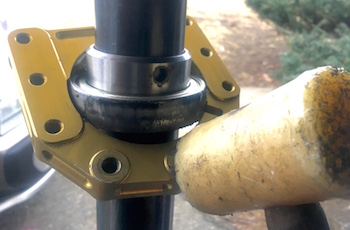
Assuming we’re dealing with a straight axle, USING ONLY A LARGE, SOFT RUBBER MALLET, TAP ONLY AS HARD AS NECESSARY the left end of the axle to remove it from the engine side of the kart. I repeat, do not hit the axle excessively hard, no matter how good it feels, even if you’re going to junk it. If you mushroom the end of the axle it will not pass through the bearings and will be very difficult to reshape so it will.
At first, only move the axle enough to reveal the marks of the setscrews. File away any burrs and wipe off the filings.
As you slide the axle you’ll need to keep the brake rotor from jamming in the caliper. If the axle slides freely through the rotor hub, you can just hold it in place by hand, if not, you’ll need to alternate tapping the axle a little, then the rotor, then the axle, then
Even with the pinch bolts fully loose, the bearings should be snug enough to require a few whacks with a light mallet.
the rotor… to walk the axle through. When the rotor is about to come off, hold it firmly to prevent it from crashing to the ground, and don’t forget to collect its key.
Remove the sprocket hub in a similar manner if mounted between the bearings.
Pull the axle the rest of the way out of the kart. Remove sprocket/hub if externally mounted. Employ the screwdriver trick from Step 5 if necessary.
If keeping the axle file any burrs, wipe clean and inspect for cracks (especially ones hidding under the bearings.) Coat with WD-40 or Marvel Mystery Oil to prevent rust.
If doing a full bearing maintenance and reinstallation (recommended) remove the bearing cassettes, then twist the bearings out of the cassettes by aligning them with the notches on the cassettes. If your cassettes are good ones, you won’t be able to twist them by hand. Slide them onto your hardest, rattiest axel and tap the cassettes to free the bearings.
Now crack open a beer and check out Part II of this series: Bearing Cleaning.