Part III of a III-Part Series Click here to download a printable version.
As I said in Part I of this series, a perfectly installed axle that spins for days is a point of pride for anyone who cares about kartcraft and going fast.
An important tip: If you’re not installing a brand-new axle, get one you can use as your “test axle” to check your work as you make your way through this installation process. All you’ll be doing with it is sliding it between the bearings, and gently nudging those bearings into alignment.
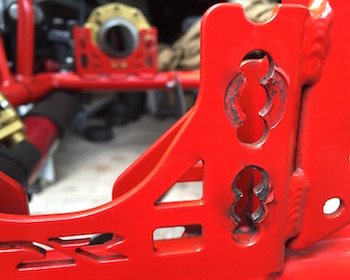
Sand smooth any metal burrs or gummed up powder coating on the chassis’ bearing cages – inside, outside and within the bolt slots. Then wipe everything clean.
Confirm that the bearings are in their cassettes as evenly as possible, then place only the two outermost cassettes into their cages on the chassis.
Install bolts to hold cassettes at the desired ride height. Leave bolts just free enough to so cassettes slide up and down within cages. We’ll hold off attaching the caliper, so skip that bolt.
Wipe the test axle and inner surfaces of the bearings completely clean. Spray the axle with WD-40 and slide it into the bearings, without the rotor or sprocket for now.
Best to have help for this step: Setting the ride height. Press both ends of axle down for the highest ride height position (more grip), slightly pick up the chassis by both ends of the axle for the middle and lowest ride height positions (less grip.) While holding, snug one bolt on each of the outside cassettes.
Fully tighten the bolts on both cassettes by working each bolt a few turns at a time, jumping between bolts in a star pattern – just as you would tighten the lugs on a street car’s wheel.
It’s magic time: Fine tuning horizontal then vertical bearing alignment:
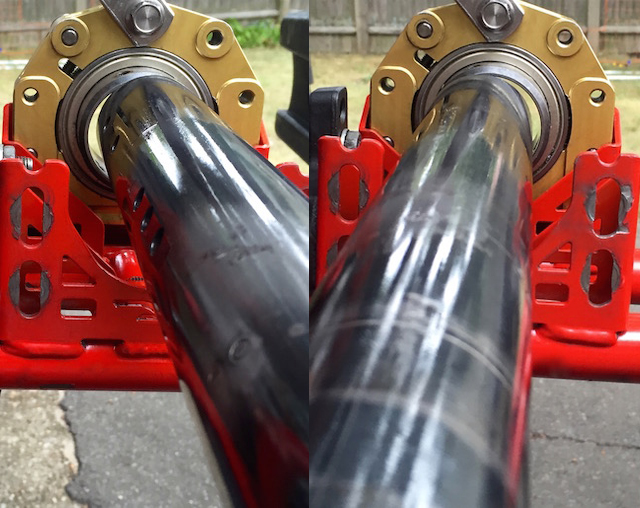
(a) Standing on the side of the kart, slide the axle just out of the far bearing.
(b) Gently push the near end of the axle towards the front of the kart, just to the point of resistance. Lean over to look down the axle towards the far bearing. You should see a crescent-shaped gap made by the outside of the axle and the inside of the bearing sleeve. Make a mental note of the size of that gap.
(c) Now gently pull the axle towards the rear. Are the gaps equal?
(d) If not, gently bump the near end of the axle forward/rearward to make those crescent gaps exactly the same.
(e) Now follow the exact same process to fine tune the vertical alignment.
Repeat Step 7 on the other side of the kart.
Your test axle should practically fly through the bearings now. If not, confirm that the cassette pinch bolts are loose, and try tapping on the tops and sides of the of the cassettes with a light mallet while spinning the axle. If still not free,
loosen all the bolts and start again at Step 6. If frustrated, jump ahead to the very last step.
Assuming you now have your test axle sliding freely, pull it out enough to pop in the third bearing, and slide the axle back in. Install the bolts fully tight, again walking them on in a star pattern. Does the test axle still slide freely? If not, try these tips:
(a) make sure the cassette pinch bolt is removed.
(b) Tap on the top of the cassette while spinning axle.
(c) Re-loosen the bolts and try again.
(d) If still bound, look to see if the bearing is visibly askew in the cassette. If so, using a medium-size blade screwdriver and light mallet, tap on the very outer edge of the bearing until nudged into alignment. (Be careful that you don’t let the screwdriver slip and crush the dust cover into the bearing.)
Now that your test axle is back to sliding freely, pull it out and set it aside. Next, put the axle you intend to use into the kart from the engine side. Remember, due to the placement of the various keys, it matters which way you insert the axle. As you do so, slide on the sprocket carrier and chain (if applicable,) which we’ll set into their final position at the end.
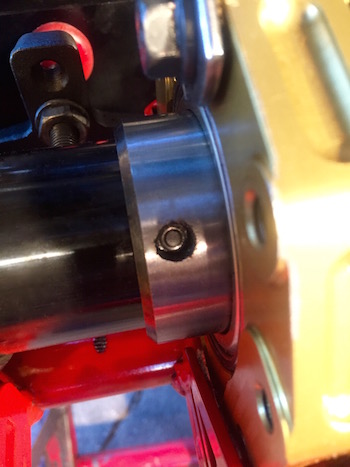
Install brake caliper.
13 Install the 3-pin brake rotor key. Then, while holding the brake rotor in position within the caliper, and with the hub keyway lined up with the key, slide the axle the rest of the way into the kart. As you slide the axle you’ll need to keep the brake rotor from jamming in the caliper. If the axle slides freely through the rotor hub, check to make sure it isn’t cracked because that’s pretty unusual. If the axel won’t pass through the hub tap a blade screwdriver into the pinch slot along the axle to spread it open. Even still you’ll probably need to alternate tapping the axle a little, then the rotor, then the axle, etc. It’s a pain.
Set the axle into position within the bearings by measuring from the outside surface of the actual bearing (not the cassette or cage) to the end of the axle. It should be the same on both sides of the kart.
Now install the setscrews that attach the bearings to the axle, typically on the two outside bearings only. If the axle was previously installed, use the existing setscrew marks. If the axle is new, use an old setscrew to score the surface of the axle by loosening and tightening it several times. (Be sure to throw away this set screw because its gripping teeth are no more.) If you’re a perfectionist, line up the two bearings setscrew on the axle.
Set the sprocket into position (remember its 3-pin key) using a laser sprocket alignment tool. Retighten the chain.
Center the brake rotor within the caliper and tighten its hub.
Install wheel hubs, 2-pin hub keys and wheels Set track width as usual.
Spin axle. It should just go and go and go… While still spinning the axle, tighten the pinch bolts on the two outside cassettes until just barely to the point that it slows the spinning.
Reattach the seat struts, radiator supports and other accessories to the bearing cassettes. Safety wire the bolts holding on your brake caliper.
Crack open a beer. You deserve it! This is arguably the most challenging mechanical task in karting (at least outside the engine.) And while your first attempt at this process might not be perfect – it should be an improvement! – you can toast yourself for being well on your way to awesomeness!
One last bit of business: After your first on-track session, give each set screw a tightening tweak. If, like me, you suffer from setscrewaphobia (fear of them coming out, or loosening and gouging your new axle, or being overtightened and denting the axle) take them out one at a time to apply a dab of Blue Loctite.